
I found this great organizational idea. Especially at this time of year I could really use it! It is from Michelle Wooderson and you can check out her other ideas at www.papertreyink.com.
Clipboard Notepad Organizer
During the holidays, I need all the help with organization I can get. Who am I kidding, I need help with organization all year long! We can talk about those New Year's goals later but let's have a little fun for the holidays, shall we? I have created something so fun for you today that you'll want to drop everything and head straight to your stamps! Go ahead and call work...tell them you're calling in *crafty* today and won't be able to make it.
I have created something that I think will help me with my holiday organization....you know, all the lists for gifts, and crafting, and baked goods, etc. It seems I start a list, and then another and then another. Before I know it, I have lists and notepads everywhere but I can never seem to find what I'm looking for. Follow along with me as I show you my Clipboard Notepad Organizer! I'm saving the final photos for the end so don't peek. Okay, I know you just peeked!
 I started out with a simple clipboard, another one of those nifty inventions that I love so much. You can leave yours plain, but I painted mine with a tan (think kraft) colored acrylic craft paint. My paint was from Michael's but you can find this at Walmart, Hobby Lobby or any craft store. I think red would have been fabulous too! Paint two coats with a sponge brush, allowing each coat to dry in between.
 Here's the painted clipboard. Not much difference in the color but I was going for that Kraft color.
  Next, take a piece of Kraft cardstock and cut it to 6" x 11". Adhere two 1/2" wide strips of Scor-Tape down the 6" sides.
 Place the cardstock horizontally over the clipboard and turn the clipboard over as shown below. Fold the edges of the cardstock around the clipboard sides with your fingers. Remove the backing from the adhesive and adhere the little flaps to the back of the clipboard.
 Turn the clipboard over and it looks like this. Set aside. This piece of cardstock wrapped around the clipboard is going to act as a sleeve for notebooks to slide in and out of. Think refills....you can use it over and over again.
 Next up is the covered notepads. I love these notepads. You get a set of ten in Vintage Cream or White for $6 bucks. So perfect, I will never be without a stash of them. These notepads are covered a little differently than my regular notepads. These flip open from the top, making them super easy to cover. Simply cut patterned paper...I'm using Pine's Rustic Snowflakes......to fit the notepad fronts. I'm using three coordinating papers from the pad to make three separate notepads.
But I know you've got it in you to try out my clipboard organizer. And stay tuned, I want to make one for every day use after the holidays are over. Hope you enjoy!!
I have created something that I think will help me with my holiday organization....you know, all the lists for gifts, and crafting, and baked goods, etc. It seems I start a list, and then another and then another. Before I know it, I have lists and notepads everywhere but I can never seem to find what I'm looking for. Follow along with me as I show you my Clipboard Notepad Organizer! I'm saving the final photos for the end so don't peek. Okay, I know you just peeked!
 I started out with a simple clipboard, another one of those nifty inventions that I love so much. You can leave yours plain, but I painted mine with a tan (think kraft) colored acrylic craft paint. My paint was from Michael's but you can find this at Walmart, Hobby Lobby or any craft store. I think red would have been fabulous too! Paint two coats with a sponge brush, allowing each coat to dry in between.
 Here's the painted clipboard. Not much difference in the color but I was going for that Kraft color.
  Next, take a piece of Kraft cardstock and cut it to 6" x 11". Adhere two 1/2" wide strips of Scor-Tape down the 6" sides.
 Place the cardstock horizontally over the clipboard and turn the clipboard over as shown below. Fold the edges of the cardstock around the clipboard sides with your fingers. Remove the backing from the adhesive and adhere the little flaps to the back of the clipboard.
 Turn the clipboard over and it looks like this. Set aside. This piece of cardstock wrapped around the clipboard is going to act as a sleeve for notebooks to slide in and out of. Think refills....you can use it over and over again.
 Next up is the covered notepads. I love these notepads. You get a set of ten in Vintage Cream or White for $6 bucks. So perfect, I will never be without a stash of them. These notepads are covered a little differently than my regular notepads. These flip open from the top, making them super easy to cover. Simply cut patterned paper...I'm using Pine's Rustic Snowflakes......to fit the notepad fronts. I'm using three coordinating papers from the pad to make three separate notepads.
 I then made toppers for the notepads using Kraft cardstock. Just use scraps that are cut the width of the notepads and wrap around the front to back....like 4" maybe....and use Scor-Tape to adhere. I stamped mine with Fresh Snow ink using Polka Dot Basics II. I finished the edges off with a Martha Stewart punch.
 Next, you just slip the cardboard backing of the three finished notepads into clipboard sleeve.
 Of course I had to embellish my notepads and clipboard:
 For the clipboard itself, I tied some Pure Poppy Swiss Dot ribbon around the entire clipboard, adding a glittery holly leaf I snipped off a sprig. The chipboard NOEL accent is from K & Company and is attached to the clipboard with pop dots.
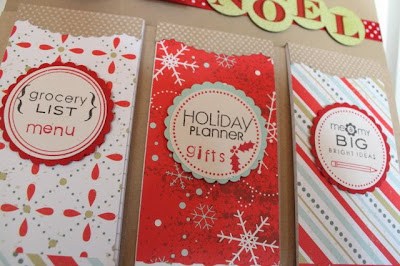
 For my three notepads, I used sentiments and circle borders from Take Note. I stamped *menu* and *gifts* with a separate alphabet set. I then punched the images out with a circle punch and backed them with Pure Poppy scalloped punched circles.
 I add final embellishments of Pure Poppy Twill Ribbon and Vintage Buttons tied with Martha Stewart striped twine.
 I love how my clipboard organizer turned out! All of my holiday stuff in one spot. Love. I'm displaying it front and center on my recipe easel.

 Next, you just slip the cardboard backing of the three finished notepads into clipboard sleeve.
 Of course I had to embellish my notepads and clipboard:
 For the clipboard itself, I tied some Pure Poppy Swiss Dot ribbon around the entire clipboard, adding a glittery holly leaf I snipped off a sprig. The chipboard NOEL accent is from K & Company and is attached to the clipboard with pop dots.
 For my three notepads, I used sentiments and circle borders from Take Note. I stamped *menu* and *gifts* with a separate alphabet set. I then punched the images out with a circle punch and backed them with Pure Poppy scalloped punched circles.
 I add final embellishments of Pure Poppy Twill Ribbon and Vintage Buttons tied with Martha Stewart striped twine.
 I love how my clipboard organizer turned out! All of my holiday stuff in one spot. Love. I'm displaying it front and center on my recipe easel.
But I know you've got it in you to try out my clipboard organizer. And stay tuned, I want to make one for every day use after the holidays are over. Hope you enjoy!!

If you enjoyed this post Subscribe to One of a Kind Gifts here!
No comments:
Post a Comment