Showing posts with label for little ones. Show all posts

Wednesday, April 28, 2010

My Car Seat Blanket

So I made my car seat blanket, and I love how it turned out.

Tara from craftaffection.blogspot.com taught me how to make this.
It can also be used as a blanket for baby to lay on when you get to your destination.
And wraps up nicely for a gift.
Thanks, Tara!
If you enjoyed this post Subscribe to One of a Kind Gifts here!

Wednesday, January 20, 2010

Jumpin Jacks Birthday


It was my son's birthday on Saturday and he got the cutest gift from our neighbors. There is this place by us called Jumpin Jacks. He got 4 free passes to the indoor inflatable playground, a flipping frog named Jack, a pair of socks (wearing socks is mandatory), and magic jumping beans. I thought it was such a creative way to give free passes. I think this same concept could be used when giving gift certificates. Just add some fun little accessories and a simple gift card becomes a unique gift.


If you enjoyed this post Subscribe to One of a Kind Gifts here!

Monday, January 4, 2010

"I See a Monster" Sock Puppets!

Last month was my nephew's 1st birthday. I thought about what I wanted to get him, and I knew I wanted to do something that was a little more personal than a store bought toy. I can't remember where I saw this idea but I came across something similar to this:


You give the gift of The Very Hungry Caterpillar  book along with a sock puppet that looks like the caterpillar, and food with holes in it that he can eat through.

I liked that idea and went to my local Walmart and found a book I knew a little one year old boy would love:
This book is a touch and feel book all about the different kinds of monsters this little boy sees.


If you click on the book it will take you to Amazon, but it was cheaper at Walmart. Then again, what isn't cheaper at Walmart? 

So I went over to the socks department and picked out a few monsters from the book that I liked and thought I would give it a go at making resembling sock puppets.

SOCK PUPPET TUTORIAL


Materials Needed:
Fuzzy Sock(s)
hot glue and glue gun
cardboard
felt
googly eyes

pom poms (optional)
pipe cleaners (optional)


I couldn't find any fuzzy socks that were long so I had to get a few pairs of ankle socks.


I cut a hole into the toe of one and hot glue them together like this (sorry the picture is a different pair- I forgot to take the first picture until after the puppet was already made):


IMPORTANT TIP: I found that when you are gluing the two socks together, it helped to have your fingers stretch the socks out as the glue was drying, otherwise it would dry and not be able to stretch at all when you try to put it on. You may get a few glue gun burns, but its not really a good project unless you do right?!?


Then I cut an oval out of cardboard ( I think I just used an empty snack box from my pantry) and I just eye-balled the size I wanted. This will be the inside of your puppet's mouth:


Then I hot glued some felt onto the cardboard. I used a different color than the sock itself so it would stand out. (Think Sesame Street puppets).


Then I cut the toe off of the top of the puppet, adjusted the cardboard so that it would work as a mouth. I folded the cardboard so that it was similar to the shape of my hand shaped as a C:


and then I glued the edges of the sock to the cardboard as if it were sewn (the outside of the sock was rolled under and glued):


Now comes the fun creative part. Decorate your puppet however you want using googly eyes, pom pom balls, felt, and pipe cleaners. I ended up making three puppets and here's the finished results:


Enjoy!


If you enjoyed this post Subscribe to One of a Kind Gifts here!

We're Participating In:


giveaways

Tuesday, December 8, 2009

The Magic Versatility of a Pom Pom Ball

Originally I found this idea at Woman's Day Magazine to make yarn pom pom balls to place on top of my wrapped Christmas presents this year. I used their video tutorial and was surprised at how easy and cheap it was to make them. The more I thought about it the more ideas I came up with for uses of pom poms balls.
For holiday decorations, you can drape them from the fold of your stockings, use them as ornaments on your tree, or hot glue them together (different sizes) and make a fun holiday garland similar to this felt one from crate and barrel:


If you have a little girl like I do, you can hot glue a pom pom to an alligator clip and use it in her hair for a cute playful look:


Here is a video tutorial on how to make the pom pom's using more than one color and fastening it to the top of a baby's hat. So cute!


UPDATE: Check out this awesome pom pom wreath made by The Pleasures of Homemaking! Imagine if you made one all in one color like white or red!


If you enjoyed this post Subscribe to One of a Kind Gifts here!

Saturday, November 21, 2009

Easy as 1,2,3 Baby Toys

1. Print your photograph onto sticker-backed photo paper.
2. Cut it into squares.
3. Attach to blocks.
Voila -- homemade baby toys!


If you enjoyed this post Subscribe to One of a Kind Gifts here!

Friday, October 23, 2009

Baby Shower Baby Hats!

I found this craft idea at Little Birdie Secrets and immediately put it in my list of things I want to try. How cute would these be at a baby shower? And if you are intimidated about making the hats themselves, I bet you could purchase the hats and take the seams out with a seam ripper where you plan to put the ears on and then sew them back up.


If you enjoyed this post Subscribe to One of a Kind Gifts here!

Wednesday, October 21, 2009

Coloring Books

The magical minds at Crayola have devised a way to turn your kid's memories into customized coloring book pages. To see the transformation: Upload digital photos at www.crayola.com/colorme. Try it for free anytime, but you need a code - in specially marked boxes of crayons ($5 for a box of 48) to print your creations. 


I thought this was a great gift idea. Print out a bunch of pages and make your own color books.
Subscribe to One of a Kind Gifts here!


If you enjoyed this post

Saturday, October 17, 2009

Featuring - Frame the [Date]


Two Sisters...


preserving a moment...


From birthdays to anniversaries, from engagements to graduations, our time on this earth is punctuated with special events of life - altering significance. Frame the [Date] provides a unique way of celebrating a moment that helped define your life or helps create a gift that will last forever as a reminder of a special day.


Frame the [Date] makes a special gift for any special occasion.

A wedding anniversary...the birth of a baby...a big graduation...a first hole-in-one or even the day a business is started. A special date is the start of a new chapter in someone's life, so why not help hold that memory close?


Turn a cherished event into a giftable work of art.

Frame the [Date]


If you enjoyed this post Subscribe to One of a Kind Gifts here!

Tuesday, October 13, 2009

Disguises for Trick-or-Treat Candy

I LOVE HALLOWEEN!!!!  I don't know why...but I doI thought I would post some fun ideas that you could use as teacher gifts or classroom gifts or just for those "Special" trick -or- treaters that come to your door! Better homes and Gardens has some great ideas!  Here are just a few...

Make a Halloween Candy Box with Fangs

This fanged box may look scary, but it holds a sweet box of candy.


   What You'll Need
  • Tracing paper
  • Patterns
  • Candy box
  • Red or pink card stock or construction paper
  • Scorer
  • Crafts knife
  • Glue gun and hotmelt adhesive
  • White card stock and construction paper
  • Red dimensional paper
  • Scissors
How to Make It
  1. Draw a rectangle on tracing paper, using the diagram as a guide and your candy box for measurements.
  2. Cut the shape from red (or pink) card stock (or construction paper).
  3. Transfer the dashed lines from your pattern to the right side of the paper.
  4. Lightly score the lines with a crafts knife. Fold along the scored lines. Hot-glue the shape to the candy box at the front, bottom, and back.
  5. If desired, cover the top and short sides of the box with a piece of red paper; glue in place.
  6. Cut teeth from white card stock (or construction paper) and glue to the rectangle ends.
  7. Add blood to the fangs with red dimensional paint.
  8. Finished size: Our boxed candy measures 3 3/4 (W) x 3/4 (H) x 1 3/4 (D) inches. Adapt the design to your boxed candy, enlarging or reducing the teeth pattern to fit.

My Eye Is on You

Spookify a classic lollipop for Halloween by making this easy eyeball disguise.


What You'll Need
  • White tissue paper
  • White floral wire
  • Colored paper
  • Black paper
  • Scissors
  • Glue gun and hotmelt adhesive
  • Red dimensional paint
  • Narrow red ribbon
  • Iris pattern

How to Make It
  1. Cut two or three 6-inch squares of white tissue paper.
  2. Layer the squares and then wrap them around the candy.
  3. Wrap and secure around the base with white floral wire.
  4. Cut the iris pattern from colored paper and the pupil from black.
  5. Clip into the iris as shown.
  6. Hot-glue the iris to the top of the candy. Add the pupil.
  7. Use red dimensional paint to make the eyeball bloodshot. Let dry.
  8. Wrap narrow red ribbon around the wire and tie in a bow.

Tombstone Territory

Candy gets a spooky place to rest in this easy craft. Cut two tombstones from gray card stock or construction paper. Cut a narrow strip of gray to fit around the outside of the candy box, piecing the strip if necessary. On the front tombstone, add "RIP" at the top and the word "open" with an arrow pointing to the bottom. See the next slide for further instructions.


Use dark gray pencils to shade the tombstone and letters. Add a silver gemstone, if desired, to the icon at the top and the middle of the arrow at the bottom. Hot-glue the gray strip around the outside of the candy box. Adhere tombstones to the front and back of the candy box, then stand up your masterpiece. The finished tombstone measures 3 1/4 x 6 inches.
Download tombstone pattern

 Happy Halloween!


If you enjoyed this post Subscribe to One of a Kind Gifts here!

Friday, October 9, 2009

Quiet Book Part 1

I am making my daughter a quiet book that we can take with us to church in hopes that it will keep her little fingers and mind busy so we are not constantly running up and down the hallways. I scoured the web collecting all of my favorite ideas from numerous places. I decided to do an ABC book, but I am afraid it may be too thick, but we'll see how it goes.

Quiet books are awesome and can be passed from child to child, and even become a family heirloom if made to last.

If you were to make this as a gift for someone, like a little niece or nephew's birthday or Christmas present, or your own child's Christmas or birthday present, you could make a much smaller version and not make it ABC specific if you are feeling intimidated.

I find that I can get about one page (one side) done a night, so that may help you to plan accordingly.

I am no where near being done so I will post an updated version later, but here are some of my pages so far to give you some ideas.


Here is my page for the letter "E". The flowers are removable from the buttons.
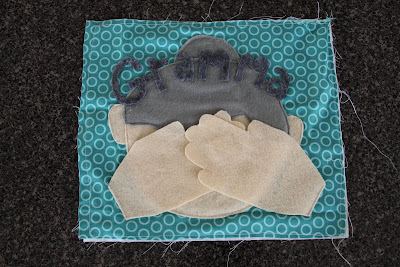


Here is my letter "G" page representing a grandma. The hands are velcro'ed together. When you open the hands up:


Gramma plays peek-a-boo with you!


Here is my letter "M" page. Its not quite done, but I haven't decided how I want to add words on the page yet. But its a mailbox that is snapped closed. When you open it:


You get a letter from Mommy, which also starts with M.


This is my Noah's Ark page. I still need to add a few more embellishments and the water at the bottom but I ran out of blue felt. Inside the zipper are these little animal finger puppets. I have a pig, chicken, zebra, cow, and giraffe.


We have a weimaraner dog named Toby. But this could be made for any dog. His ear flips up and down to show a pink underside. The leash and collar buckle together.


I have another page thats in the beginning stages of a shoe that you can tie using the "There was an old woman that lived in a shoe' nursery ryhme. I started this project last Saturday and I have been working on it after my daughter goes to bed, so if you have more time you could do a cute little book relatively quickly. When all the pages are done I plan to sew them together and punch three holes along the edge with eyelits and then bind them together with metal rings.

Here are a couple of websites that gave me the most inspiration and have details on how to get started, materials you need, and even free pattern printouts:

Homemade by Jill - her posts in April go through each page individually
How to Make a Quiet Book


If you enjoyed this post Subscribe to One of a Kind Gifts here!

LinkWithin

Related Posts with Thumbnails