Showing posts with label Sewing. Show all posts

Friday, April 9, 2010

Book Covers

I am not a sewer so I am pretty proud that I did this all by myself without a pattern. Granted its super snug on the book so next time I will give myself more margins but you live and you learn. Using scrap fabric left over from my refurbished craft chair project and random ribbon I already had, I came up with this book cover I now use over my scriptures.


Ok I lied about doing it all by myself. I made the "2 minute flower" using the tutorial from Craftaholics Anonymous. SuPeR EaSy! I added velcro and a strip of fabric to keep the book closed.


If you aren't as brave (or stupid) to wing it like I did, there are plenty of book cover tutorials on the net. I was specifically looking for one for lds scripture covers and all I could find was inspiration from sites that sell them like this one. She makes the most darling scripture covers and matching totes to carry them in. Here is a little inspiration for you:


I can't find the other picture I saw but it had a place to put crayons or marking pens on the backside.


If you enjoyed this post Subscribe to One of a Kind Gifts here!

Tuesday, February 16, 2010

Ruffled Camera Strap


Char at Crap I've Made has posted a great tutorial on how to make these adorable ruffled camera straps. I am putting this on my to do list. So adorable! Thanks for sharing!

If you enjoyed this post Subscribe to One of a Kind Gifts here!

Tuesday, November 10, 2009

Fabric Luggage Tags For Travelers

Is there someone you know that travels alot, maybe for business? If so, here is a fun gift idea you can make to help them spot their luggage easily from baggage claim:


Here is the tutorial on how to make this fabric luggage tag over at Skip to My Lou. Enjoy!


If you enjoyed this post Subscribe to One of a Kind Gifts here!

Tuesday, November 3, 2009

Recycling Sweaters for Cozy Gifting!

Martha (who needs no last name) has a cute idea at her blog right now about recycling your sweaters that are too old to wear but too sentimental or cool to throw away. She suggests making mittens or throw pillows out of them.


I hate being cold in the winter and getting some mittens or comfy pillow covers would really comfy cozy me right up!

She says, "...incorporate the stitch patterns and designs commonly found on sweaters. To begin, machine-wash a woolen garment in hot water, and toss it in a dryer set to a high temperature. (You may need to wash and dry it more than once. If you can snip the fabric with scissors and it doesn't fray, it's felted.) Then it's a matter of cutting out shapes and stitching pieces together. Get started now, and you'll have plenty of presents at the ready for holiday giving."


If you enjoyed this post Subscribe to One of a Kind Gifts here!

Friday, October 9, 2009

Quiet Book Part 1

I am making my daughter a quiet book that we can take with us to church in hopes that it will keep her little fingers and mind busy so we are not constantly running up and down the hallways. I scoured the web collecting all of my favorite ideas from numerous places. I decided to do an ABC book, but I am afraid it may be too thick, but we'll see how it goes.

Quiet books are awesome and can be passed from child to child, and even become a family heirloom if made to last.

If you were to make this as a gift for someone, like a little niece or nephew's birthday or Christmas present, or your own child's Christmas or birthday present, you could make a much smaller version and not make it ABC specific if you are feeling intimidated.

I find that I can get about one page (one side) done a night, so that may help you to plan accordingly.

I am no where near being done so I will post an updated version later, but here are some of my pages so far to give you some ideas.


Here is my page for the letter "E". The flowers are removable from the buttons.


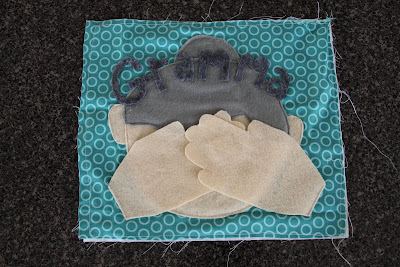
Here is my letter "G" page representing a grandma. The hands are velcro'ed together. When you open the hands up:


Gramma plays peek-a-boo with you!


Here is my letter "M" page. Its not quite done, but I haven't decided how I want to add words on the page yet. But its a mailbox that is snapped closed. When you open it:


You get a letter from Mommy, which also starts with M.


This is my Noah's Ark page. I still need to add a few more embellishments and the water at the bottom but I ran out of blue felt. Inside the zipper are these little animal finger puppets. I have a pig, chicken, zebra, cow, and giraffe.


We have a weimaraner dog named Toby. But this could be made for any dog. His ear flips up and down to show a pink underside. The leash and collar buckle together.


I have another page thats in the beginning stages of a shoe that you can tie using the "There was an old woman that lived in a shoe' nursery ryhme. I started this project last Saturday and I have been working on it after my daughter goes to bed, so if you have more time you could do a cute little book relatively quickly. When all the pages are done I plan to sew them together and punch three holes along the edge with eyelits and then bind them together with metal rings.

Here are a couple of websites that gave me the most inspiration and have details on how to get started, materials you need, and even free pattern printouts:

Homemade by Jill - her posts in April go through each page individually
How to Make a Quiet Book


If you enjoyed this post Subscribe to One of a Kind Gifts here!

Friday, September 25, 2009

Fall Scarves Sewing Tutorial

With the cooler weather approaching, its time to rearrange our wardrobes. And what is the perfect fall accessory? Scarves!!! Don't know how to knit? That's ok, no knitting required. 


I don't consider myself blessed in the sewing department. I can do some basics and I am learning more with each new project. But when I found this I thought, "That seems easy enough, I think I could do that!" This designer made a few of them for her friends as gifts.


Here's how you make them:

"I cut a bunch of fabric scraps and sewed them together in a long strip about 60 inches long. I backed that with corderoy of the same length and sewed them together with right sides facing. I left a 3 inch opening on one of the short ends for turning. After I turned them I top stitched all along the edges.
That’s it! That’s all you have to do! Sandwich your fabric right sides together, leave yourself an opening, turn and topstitch. You can totally make that for this weekend! Heck you could probably get a jump on your holiday gifts, too.
You can see the full thread here: http://www.craftster.org/forum/index.php?topic=304813.0"

She has a few other pictures on the forum for you to get some other ideas. How great would these be for fall birthdays or Christmas gifts?!?


Don't forget to sign up for the giveaway, it ends tomorrow!!!

If you enjoyed this post Subscribe to One of a Kind Gifts here!

LinkWithin

Related Posts with Thumbnails